Contacts
Form View Explained
Top Nav Buttons Explained
Sort Button
Use the Sort button to arrange your list view by various criteria, e.g. you may wish to view your customers by Last Name, First Name, Email Address, Customer Number.
New Contact Button
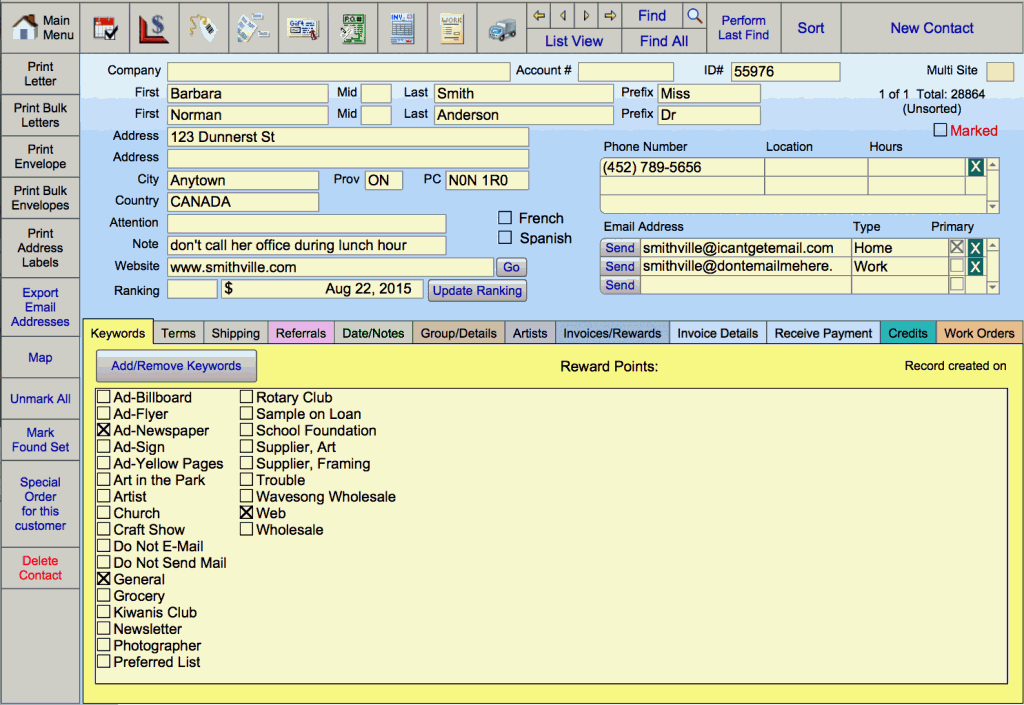
New Customer or Contact button is used to enter customers, vendors, and service providers, such as your bank and lawyer.
Clicking the New Contact button creates a new record which is automatically assigned a 5 digit ID#.
Warning: Do not change the ID # otherwise the relationships with other files will be lost.
Information Entry Section Explained
Company Field
The Company field is used to enter the name of the business or group with which your customer is associated, e.g. Jim’s Diner, East Public School, Boy Scouts.
Account Number (Vendor Account) Field
The Account # field should be filled in when entering a vendor for moulding or matboard, etc.
When a number or letters are entered into this field, the vendor can be linked to the Price Codes and Products files as a company from which you can place orders.
You cannot create Frame Orders or Purchase Orders for this vendor if the field is blank.
Contacts Fields
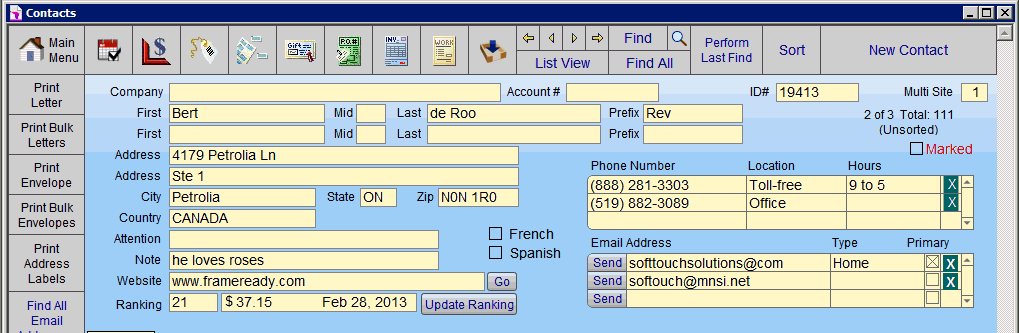
You may enter the first, middle initial and last names of one or two contacts.
Any change made to the customer information is reflected in all of the FrameReady files that contain that ID#, e.g. change address, correct spelling, etc.
The Prefix field contains a pop-up list of prefixes from which to select, e.g. Mr, Mrs, Dr, etc. If a prefix is selected, only the first initial of their first name appears on envelopes, letters and address labels. Letters will be addressed to Mrs P Jones but start with Dear Mrs Jones.
Note: Click on the Print Letter side bar button to use the Name Override field to use any alternate wording for letters and envelopes.The Marked box is a way to identify a group of contacts for any number of purposes; mailing, calls, emails, etc. See also: Using the Marked Field
The Multi Site field indicates the location where the customer record was created (only available on Multi Site version).
The Ranking feature is a powerful marketing tool (Not available on Lite version).
The Creation date is automatically assigned and cannot be modified. Records may be searched by this field.
The check boxes indicate which language the customer’s printed documents appear in. If neither box is marked, all documents print in English. A language selection does not affect in-house documents such as the Work Order. Documents affected are generally those which have your company logo or name on them. The Gift Certificate file is the exception as it is presented to a third party and may be printed in the language of the recipient.
Phone Number Portal
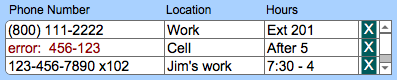
Displays the number, location and hours of accessibility of the contact’s first three phone numbers. An unlimited number of phone numbers can be stored in the file. Use the scroll bar to view the other numbers. Use the teal X to remove entries.
Note: The Phone Number field is auto-formatted into a ten digit format. If you wish to include a telephone extension, enter the full phone number including the extension and then hold down the Ctrl key (Windows) or Command key (Mac OS) and click in another field to by-pass the auto-formatting (otherwise an error message may appear in the field).
If you enter 7 digits, then the field automatically formats to add your area code (as defined in the Phone 1 field in the Main Menu > Set Up Data) as well as the hyphen. If the area code is different than yours, then use the ten digit format.
If you enter fewer than 7 digits or more than 10, the word error: appears in red text to alert you that you have entered the customer’s phone number incorrectly (the text returns to black and the word error: is removed when the number is between 7 and 10 digits). If the word error: appears in the field because of an extension number added into it, then remove the extension to correct the field formatting before adding the extension and using the Ctrl or Command key to bypass the auto-formatting. Extensions can also be added into the Hours field by ignoring the drop down list and typing directly into the field.
The Location identifies where the phone is situated (e.g. work, home), or the type of phone (cell), or who the phone belongs to (Bert, Kelly). Choose Edit… (at the bottom of the list) to customize the list. To prevent the list from becoming unwieldy, hand-enter unusual entries directly into the field above the drop down list (these will appear in the field but will not be part of your quick selection menu).
The Hours field identifies the best time(s) to reach the contact. You can also store extension numbers in the field or other pertinent information by ignoring the drop down list and typing directly into the field.
Tabs Explained
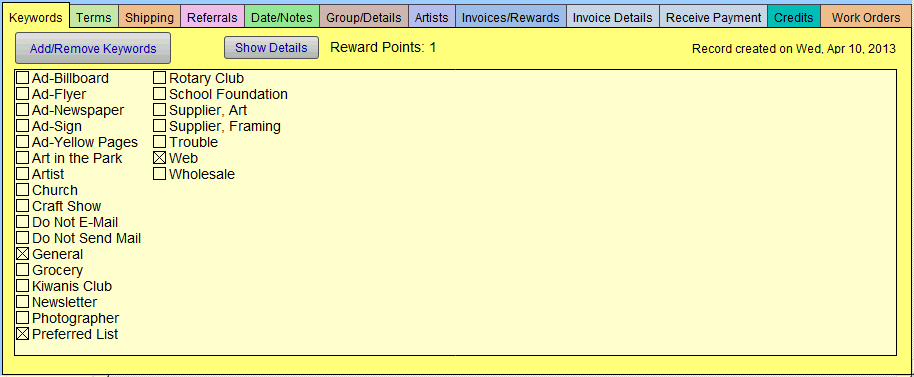
Each colored tab in the lower half of the form view provides detailed information concerning this contact or customer.
Store additional data such as; birthdays, tax exemption information, referrals, shipping address, preferred artists, and in-store credits. Work Orders and Invoices can be easily accessed.
Tabs available in Full Version: Keywords, Terms, Shipping, Referrals, Date/Notes, Group/Details, Artists, Invoice/Rewards, Invoice Details, Receive Payments, Credits, and Work Orders.
Tabs available in Lite Version: Keywords, Terms, Shipping, Referrals, Date/Notes, Group/Details, Artists, and Work Orders only.
See also: Contacts File Tabs
Important Features to Note
All records in the Contacts file have an ID#. This unique number links customer information throughout the files and is automatically assigned.
Do not change the ID # or the relationship with other files will be lost.
The Website field must have www. or http:// as prefix in order for the adjacent Go button to open your internet browser.
Record your customer’s Email address. The Send button will access your email program. A dialog box will ask you if you wish to send email to the current record or all records in the group. The Find All button will search through all of your records and find all contacts with an email address. The screen will change to show the first record with an email address. The number of records in the found set will be displayed in #8 (e.g. 1 of 38). Click on the List View button to see all the contacts found.
Any Note entered appears on all screens with this customer’s information so be discrete. However, note data does not print onto any documents. Use this field for information about this individual customer (e.g. “Color blind – so be extra helpful”).
The Attention field can be used for business contacts other than the individual entered in the First and Last name fields. The name in the attention field will supersede the entry in the first & last name fields. Envelopes, labels and letters will print as Attn. Gary. All other printouts will show the entries in the first/last name fields.
Do not use the Prefix field with the Attention field or you will have Attn. Mr Gary, even when there is a last name entered. This field is only accessible in the Contacts file.
Country, Territory and Postal Code Headings can be changed in the Main Menu > Set Up Data > Info. E.g. USA, State, ZIP or Canada, Prov, PC.