Contacts
HTML Email Templates
HTML Email Templates
-
HTML Email Templates shipped in FrameReady12. These emails currently are only available within the Contacts File, allowing you to send direct emails to your customers regarding upcoming events and sales. In order to make these work, there are a few things you will need to do outside of FrameReady to prepare for your template.
-
The most important thing you will need to prepare outside of FrameReady is the HTML code that will become your email message. For those with no experience writing code, there is a specific kind of HTML Editor that will assist you called a WYSIWYG Editor. WYSIWYG stands for “What You See Is What You Get” and that means you can create your layout and it will create the appropriate HTML that goes with it. There are many different editors to choose from including simple browser based editors to high end applications with many different features that can help you create these layouts.
Before You Begin, Have the Following Ready
Regardless of which editor you use, we recommend that you have the following prepared whenever you are creating a template. Having this information in an easy to access place is highly recommended as you will be referring to it as you create the template.
-
Images for your header and footer saved to an online image directory. And a URL (web address) to connect to them.
You can use many different online image storage sites, such as Imgur and Flickr. If you have a website, you can also include links from your website to the images you'd like to use for your emails. -
A List of Merge Fields you would like to use in your email template.
Commonly used merge fields include customer name and your business information. Right click the link and choose save as to download a PDF copy of commonly used merge fields. -
If you also have a text file you will copy the merge fields from, add in the important code <!doctype html>. The details regarding this will be explained later.
Enable HTML Email
-
Before the HTML Templates feature can be used within FrameReady, you will need to use FrameReady to send your emails.
-
Click Set up HTML Email to turn this feature on.
Build an HTML Template using an HTML Editor
-
For those with no experience writing code, there is a specific kind of HTML Editor that can assist you called a WYSIWYG Editor.
-
WYSIWYG stands for “What You See Is What You Get” and that means you can create your layout and it will create the appropriate HTML that goes with it.
-
There are many different editors to choose from including simple browser based editors to high end applications with many different features that can help you create these layouts.
Please note: The following are basic, recommended steps that may change depending on the editor you use and the design you are creating.
-
Add your visuals to the template by clicking the Image button to insert and it will ask for the “source”. The source is the URL we prepared ahead of time for the image. Add this URL in the requested field.
You can select the image and choose to align it as needed. This gives a uniform look across all methods of viewing the email, such as cellphone or desktop browser. -
When entering text for the template, you can use merge fields to fill in appropriate information such as your customer's name or your business information. When typing in the text for the message, copy and paste in the merge fields as needed.
-
Remember that when you add in text that you will edit depending on the situation, the code created to make a paragraph will need to be either added in or removed depending on the situation. Take out when you need less text. Add in when you need more.
Important Note: The text of your message will appear between a pair of bracketed tags, e.g. <p>This is my sentence.</p>.
If your text does not appear between these tags, then it can affect how it is visualized when you send the email.
Tip: Code created within an HTML Editor can be copied from the Editor into FrameReady's Email Templates. You can also create your own code within FrameReady if you are familiar with HTML.
How to Create the HTML Template
-
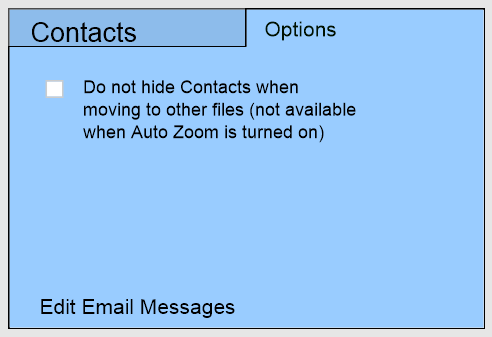
On the Main Menu, in the Contacts area, open the Options tab.
Click the Edit Email Messages... button.
-
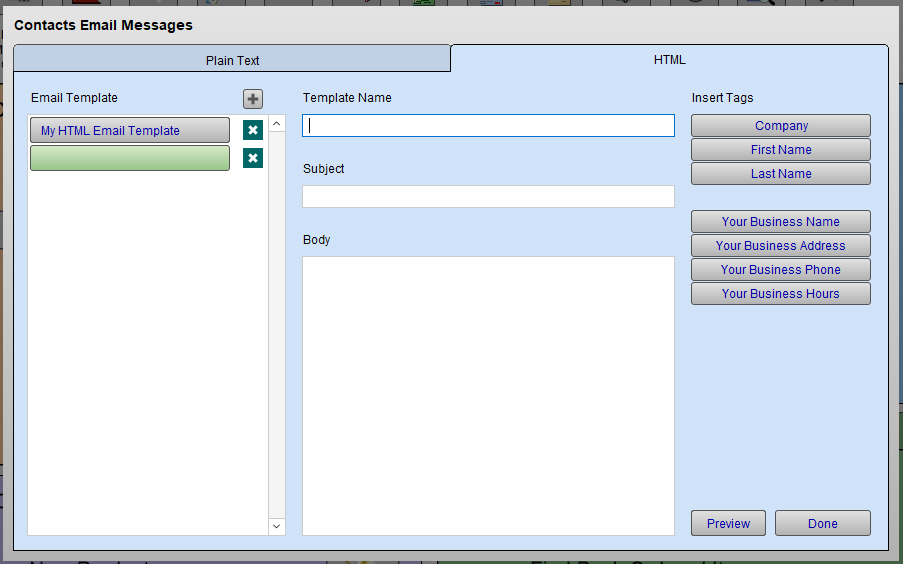
The Contacts Email Messages window appears. Open the HTML Template tab.

-
Click the plus icon to create the new template.
The layout is similar to the Plain Text templates. You can enter a name for the template at the top.
-
In the Subject field, type in any subject that suits the template you are creating. If needed, you can also use the Merge Field buttons to the right to add those fields wherever your cursor is currently.
-
In the Body field, add in <!doctype html> as the first line. This indicates that the message is an HTML template. On the second line, paste in the code from your HTML editor.
Now you have a completed HTML Template. When you go to send an email from the Contacts file, you can select this template from the list of templates you have created. It will automatically fill in the information in your merge fields based on the contact you have selected to send the email.
Send an Email with an HTML Template
-
Locate the customer you wish to email.
-
Click the blue Send button beside the customer's email address.
-
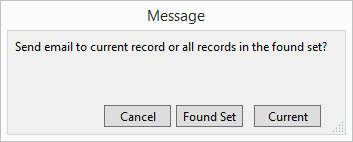
A dialog box appears and asks if you wish to send to email to the current contact or to all records in the found set.
If you are sending to multiple customers, then choose Found Set.
If you only want to send to one customer, then choose Current.
-
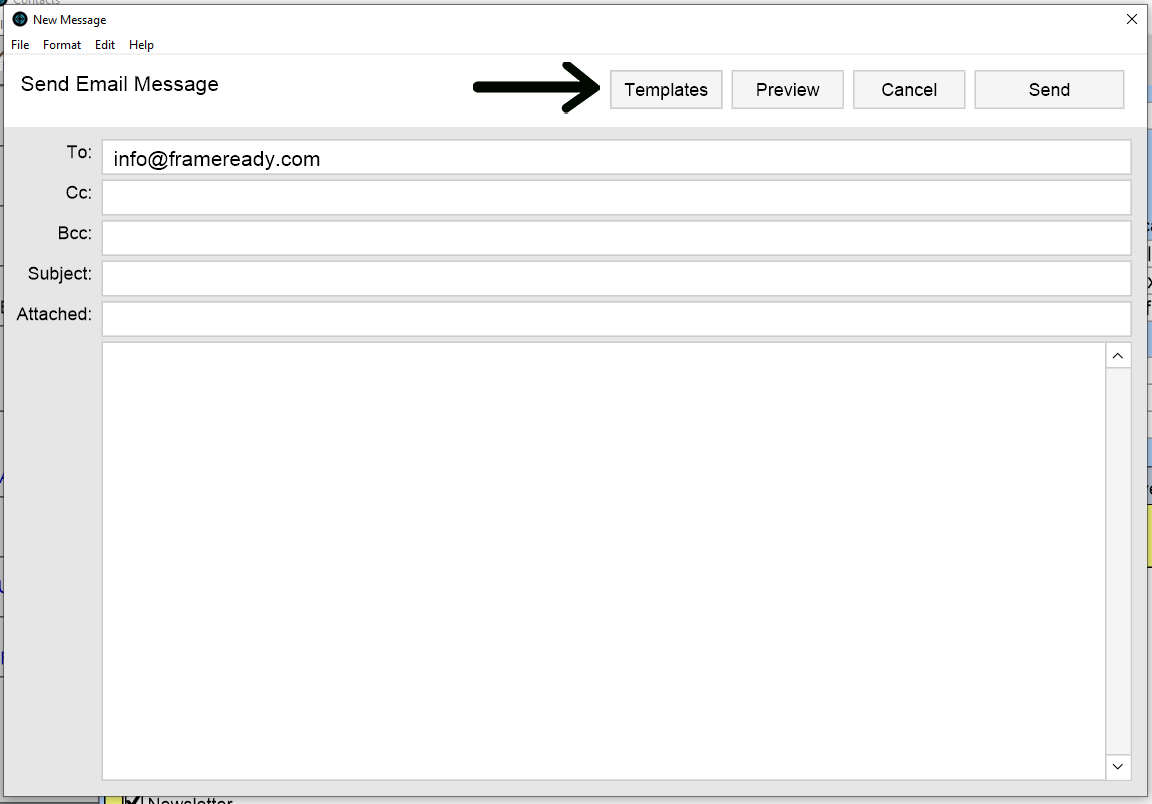
The New Message window appears.
Select the Template you will be using by clicking the Templates button. Select your template from the list.
-
Review the contents of the email. At this time you can make adjustments and change text.
-
Before sending the email you can preview the email to confirm that it will looked as you would like. Click the Preview button to review the email. Click anywhere outside the window that appears to close it.
-
Click Send when you are satisfied.
Mail Merge Fields
The Section Sign: §
Hold down the Alt key and type 0167
When designing your HTML email, use the following merge fields as needed:
Merge Fields for Contacts
The following merge fields are available for HTML email in the Contacts file:
-
§Company§
-
§First Name§
-
§Last Name§
-
§Your Business Name§
-
§Your Business Address§
-
§Your Business Hours§
-
§Your Business Phone§