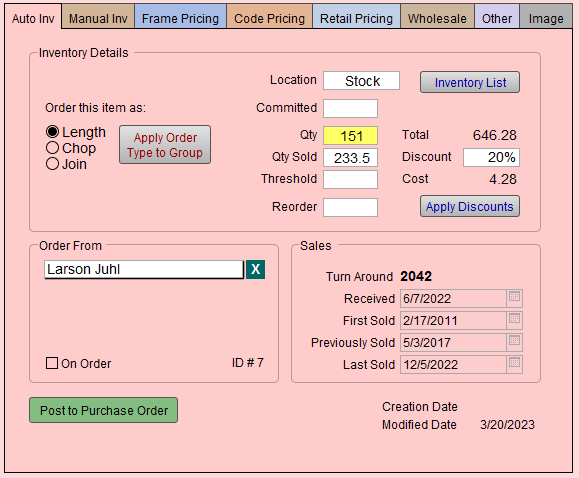
Auto Inventory Tab
The Auto Inv tab is used to identify inventory levels (used when FrameReady is set to automatically update your inventory either on a Work Order or on an Invoice.)
-
See also: Inventory Management Overview
How to Turn On/Off Auto Inventory
-
To set this up, go to Main Menu > Work Orders section.
-
Open the Options tab, then click the More Options button.
The Work Order Defaults window appears. -
In the General tab, locate the Auto update of materials inventory checkbox.
-
Check the box to enable Auto Inventory.
The Auto Inv Tab (Moulding Group Only)
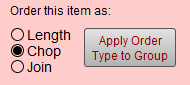
Order this item as Checkbox
-
Shows three radio buttons; Length, Chop or Join. This option allows you to order your product as length moulding, chopped moulding, joined or closed corner frame regardless of how you may wish to price your frame.
-
You may wish to price by Chop but order as Length, depending on the formula used to calculate the retail price per foot. See also Price Moulding by Join but Order it by Chop
Apply Order Type to Group Button
-
Click the Apply Orer Type to Group button to change the order type for a selected group of records. Depending on your formula, this action could change the retail price of your records.
-
Option 1: Select the Cost Type you wish to use when ordering all your moulding. Click Length, Chop or Join.
FrameReady may take a few moments to update all records. -
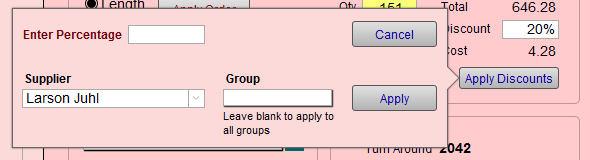
Option 2: Select the Cost Type and then select the Supplier and/or Group you wish to use (leave Group blank to apply to all groups). Select Length, Chop or Join. Click Apply.
All Groups (except Multi Angle)
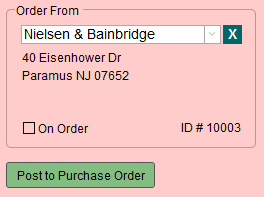
Order From Drop-down
-
A drop-down list of companies. Suppliers must be entered in the Contacts file with a number in the Account # field in order for a company to appear on this list.
-
Green X removes the vendor ID number from the Order From field. ID# is the vendor Identification number auto-filled from theContacts file.
-
See also: Create a New Supplier / Vendor Record.
On Order Checkbox
-
If the quantity falls below the Threshold and a Reorder amount is present, then the item will be entered onto a purchase order.
-
An X appears in the On Order checkbox to let you know the item is currently on order.
-
When the item is “Accepted” on the Purchase Order, the field is cleared.
Post to Purchase Order Button
-
Click to enter this item on a new or existing PO.
-
If there is a quantity in the Reorder field, then FrameReady enters that quantity, otherwise it inserts a quantity of 1 . It specifies the unit as Each
-
Once used, the dialog box alerts “This item has been marked as already being on order.” and an checkmark appears in the On Order field.
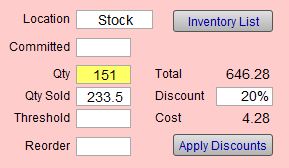
Location Field
-
Tracks where the item is stored, e.g. stock, shelf, or bin, etc.
-
You may use numbers, letters, or a combination.
Inventory List Button
-
Click to view a list of your inventory.
-
The list displays additional fields that may be useful when doing a physical inventory.
Committed Field
-
FRAMEREADY WHOLESALE ONLY
-
Used to flag that a moulding has been selected on an order which has not yet been processed.
Qty Field
-
Displays the available quantity/footage.
Qty Sold Field
-
Requires Automatic Inventory to be enabled.
-
This field is updated as items are entered on a Work Order.
-
Moulding is deducted based on required footage and is rounded up to the nearest half foot.
-
See also: Moulding Usage By Supplier
Threshold Field
-
Used in conjunction with the Purchase Orders file.
-
When generating a Frame Order, FrameReady searches for items where the quantity is less than the amount in Threshold. This trigger value will automatically add a line to the Purchase Order for the vendor specified in Order From field.
-
Do not use a value of 0 (zero).
Reorder Field
-
The quantity to be ordered on a purchase order when the Qty is less than the Threshold.
Total Label
-
Shows the calculated worth of your inventory (Qty x Cost = Total inventory dollars).
Discount Field (of Inventory)
-
Used to accurately reflect the true dollar value of your inventory.
-
If you receive a discount when purchasing this inventory, then enter the percentage in the Discount field. The total will be based on the discounted Cost shown.
-
A value here will not affect the price you charge your customers. Instead, the value is used to accurately reflect the true dollar value of your inventory.
Cost Label
-
The calculated value of your inventory after the discount.
Apply Discounts Button
-
Used to add a discount amount to all records for a Supplier and/or Group to accurately show the cost of inventory.
-
The pricing of moulding and matboard can also be created based on the Discounted Cost of the product, which is beneficial to discount framers who need to compete on lowest price.
Calculate L,C,J
-
FRAMEREADY WHOLESALE ONLY
-
Takes the wholesale cost and calculates the appropriate Length, Chop and Join prices.
Wholesale Cost
-
FRAMEREADY WHOLESALE ONLY
-
What you pay your supplier.
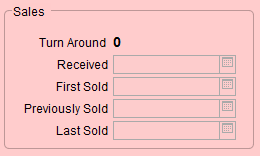
Turn Around Label
-
The number of days from when the stock was previously sold and when it was last sold.
-
Use this field to identify stock that is not selling or under performing.
Received, First Sold, Previously Sold, Last Sold Labels
-
Only available when Auto Inventory is enabled. See: Automatic Inventory Overview
-
Date fields to indicate when the stock was last received, when it was first sold, previously sold, and when it was last sold.
-
The received field is updated when stock is accepted on a PO. You can also modified these values on this screen.
Creation Date Label
-
Date field for when this record was added to the Price Codes file.
Modification Date Label
-
Date field for when any changes were made to the record.
© 2023 Adatasol, Inc.