Use the Rapid Entries Screen
Rapid Entries is designed to quickly enter multiple retail items into an Invoice and is particularly useful with barcode scanners.
Rapid Entries Overview
The Rapid Entries screen is particularly useful with barcode scanners; the Item Number field is selected and ready for input. Scan the barcode. The item is entered with a Qty of 1 . Continue to enter or scan all items.
How to Activate the Rapid Entries Screen
-
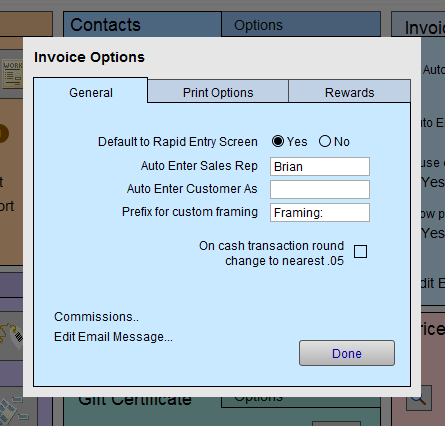
From Main Menu, open the Options tab in the Invoices section.
-
Click the More Options... button.
-
In the General tab, look for the Default to Rapid Entry Screen control and select Yes.
Rapid Entries Screen Explained
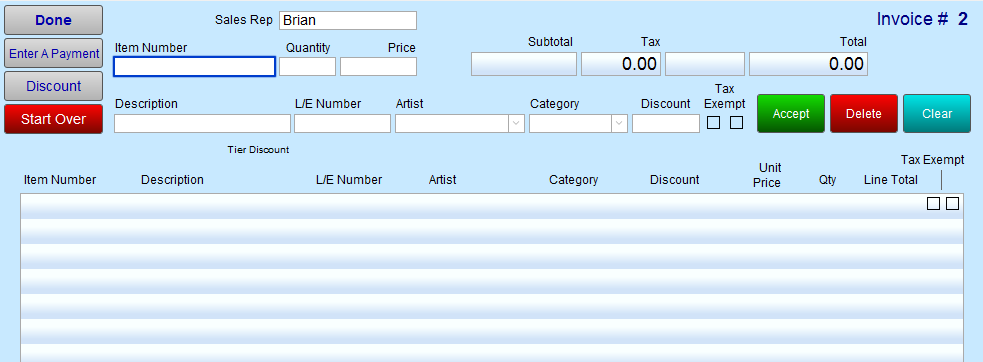
Done Button
-
Exits the Rapid Entries screen and returns to the Line Item Entry screen.
Enter a Payment Button
-
Opens the Receipts window for recording a payment.
Discount Button
-
Triggers the Calculate Discount window to auto-enter a discount.
-
Select a discount to apply to all retail items on the current Invoice. When finding line items to subtotal, FrameReady automatically omits items that already have a discount, or if the category is a Work Order or Gift Certificate.
-
Select a preset or enter the discount value in the Discount field. It is recommended that you enter all items eligible for the discount, apply the discount, and then enter non-discounted items (or group items by their discount rate).
Start Over Button
-
Removes all line entries, but only if no payments have been made on the Invoice.
Sales Rep Field
-
Mandatory; a name must be entered before leaving this screen.
-
Set a default in Main Menu > Invoice section > Options tab. See: Set up Invoice Options
Item Number Field
-
When the screen appears, the cursor is positioned in this field for the benefit of barcode scanners.
-
Items in the Products file with a UPC Number will only display the UPC# and not the Item Number. If you type in the Item Number manually and press Enter then the same information will be looked up.
Quantity, Price, Description, L/E Number, Artist, Category Discount, Tax Exempt Fields
-
Data is pulled from the Products file when a valid Item Number is entered.
Accept Button
-
Clicking on a line item populates the fields in the upper portion of the screen. Now you are able to edit any of the fields, for example, QTY, and save the changes by clicking Accept.
Delete Button
-
Clicking on a line item populates the fields in the upper portion of the screen. Delete removes the line.
Clear Button
-
Blanks out all fields in the upper portion of the screen.
How to Use Rapid Entries Feature
-
Click the Rapid Entries button.
The Rapid Entries Screen appears. The cursor is placed in the Item Number field. -
Scan the barcode or enter the Product/Item Number and press Enter, Return or Tab on your keyboard.
The item is entered as a line item with a Qty of 1 (or the default Qty as specified in the Price Codes file). -
Continue to enter or scan all items.
-
Click Done to return to the Line Item Entry screen
-
Click Discount to apply a bulk discount to Product items.
-
Click Enter a Payment to handle the sale.
How to Manually Use the Rapid Entries Feature
-
Click the Rapid Entries button.
The Rapid Entries Screen appears and the cursor is placed in the Item Number field. -
Enter the product number manually and press Enter or Return on your keyboard.
FrameReady looks up the item and a Qty of one is added. -
If you press the Tab key, then the cursor tabs through the fields and does not perform a lookup in the Product file (you would do this if the item was not in the Product file.)
-
You are required to click and Accept the entry in order for it to appear as a line item.
How to Edit a Rapid Entry
-
Select the line entry item.
The Item Number, Quantity, Price, Description etc. appear. -
Adjust the values as needed.
-
Click the Accept button to commit the changes.
The Accept button must be clicked or the edit will be lost.
How to Delete a Rapid Entry
-
Select the line entry item.
The Item Number, Quantity, Price, Description etc. appear. -
Click the Delete button to remove the selected line item.
The item is removed, no warning dialog appears.
How to Enable or Disable Rapid Entries
-
On the Main Menu, in the Invoices section, open the Options tab.
-
Click the More Options button.
The Invoice Options window appears. -
Open the General tab and locate the Set Default to Rapid Entry Screen radio button:
-
Yes - FrameReady defaults to the Rapid Entry screen each time an Invoice is created.
-
No - FrameReady will default to the convential Line Item Entry screen each time an Invoice is created.
-
-
Click Done.
© 2023 Adatasol, Inc.