Backups
Making a Backup (FrameReady 10)
Make a Backup with FileMaker Server
Where is FrameReady Installed?
Default location of FrameReady 10 and Earlier
Windows: C:\SoftTouch Solutions\FrameReady
mac OS: Applications\FrameReady
-
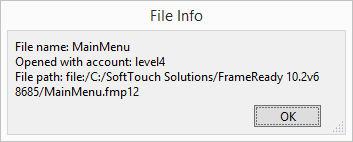
Go to the Main Menu and from the top menu bar, click Help > About this file...
-
A dialog box appears. Note the File Path:
-
This is where the FrameReady files are located.
How to Make a Backup in Windows
Tip: If you are networking, then the backup can only be done on your Host computer.
-
Quit out of your FrameReady program.
-
Open the Windows File Explorer program Windows key + E .
-
Locate and click Local Disk C.
-
Locate and double-click the SoftTouch Solutions folder.
-
Right-click your FrameReady folder and select Copy.
You may have earlier versions of FrameReady on your system; be sure to choose the version you are currently using! -
Plug in your USB drive.
-
Double-click the drive that represents your USB drive.
-
Go to the Edit menu at the top of the screen and click Paste.
-
If you do not see the edit menu, press the Alt key on your keyboard.
You may see a progress bar as the files are copied to the USB drive. -
Right-click the FrameReady backup folder and select Rename. Add the current date to the folder name.
A month (02), day (05), year (2018) format is recommended, e.g. FrameReady 11 02052018 -
Remove the backup device from the computer and be sure to safely store it off-site.
Zip Backup Option for Windows
-
Right-click the FrameReady folder and choose Send to > Compressed (zipped) folder.
-
When Windows finishes zipping up the folder, rename the zip file such as FrameReady Backup January 5 2018.zip
-
Copy the file to another storage location, such as USB drive, a network drive or cloud folder and be sure to safely store it off-site.
How to Make a Backup in Macintosh OSX
Tip: If you are networking, then the backup can only be done on your Host computer.
-
Quit out of your FrameReady program.
-
Open Finder and, in the left pane, look for and click Applications. In the right pane, scroll down and locate the FrameReady folder.
-
Single-click the FrameReady folder, so that it's selected and, in the menubar, click Edit and choose Copy.
-
Close this window.
-
Plug in your USB drive.
-
If a new Finder window doesn't automatically open, then look for an icon on your desktop that represents your USB drive. Double-click it and Finder opens.
-
From the menubar, click Edit and choose Paste.
A progress bar appears as the files are copied over. -
When your Mac finishes zipping up the folder, rename the zip file such as FrameReady Backup January 5 2018.zip
-
Remove the backup device from the computer and be sure to safely store it off-site.
Zip Backup Option for Mac
-
Right-click (or Control + click) the FrameReady folder and choose Compress "FrameReady"
-
When your Mac finishes zipping up the folder, give the file a useful name such as FrameReady Backup January 5 2018.zip
-
Copy the file to another storage location, such as USB drive, a network drive or cloud folder and be sure to safely store it off-site.
See also: Restoring From a Backup