Work Orders
Fit to Outside Dimensions
You can specify the outside dimensions of a piece and have FrameReady calculate the inside opening. This is very helpful when framing mirrors or framed items which cannot exceed a specified dimension.
How to Fit to Outside Dimensions
Caution: When Auto Inventory is active, this button is not visible until you click the Modify Work Order button.
How to Fit a Frame for a Mirror
-
Create a new Work Order.
-
Enter the moulding number into the Frame1 field.
If you later change to a different moulding number, then click the Fit to Outside Dimensions button again to recalculate the size. -
Click the Fit to Outside Dimensions sidebar button.

-
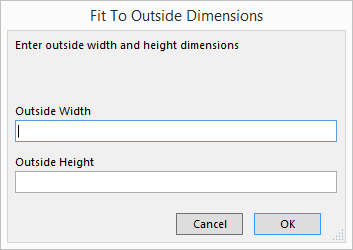
A dialog window appears.
-
Enter the Outside Width and Outside Height.
-
Click OK.
Note: Once you have clicked on the Fit to Outside Dimensions button and entered the size, you can add other items and then click on the button again to have the opening size recalculated.
Important: FrameReady takes into account the width of the moulding (from the supplier) as it is entered in the Price Codes file. For better accuracy, it is recommended that you confirm the width of the moulding in the Frame1 field.
How to Change to a Different Moulding
Each time you enter a moulding (or several layered) you must perform a re-calculation by clicking the Fit to Outside Dimensions button.
-
Delete the current moulding entry in the Frame1 field.
-
Enter the new moulding.
-
Click the Fit to Outside Dimensions button.
How to Enter New Dimensions or Modify Existing Dimensions
-
Hold the Shift key while clicking the Fit to Outside Dimensions button.
-
Enter new values in the Outside Width and Outside Height fields.
-
Click OK.
How to Disable this Feature
-
To turn off or stop using this feature on a Work Order, hold the Shift key while clicking the Fit to Outside Dimensions button.
-
Delete the entries in the Outside Width and Outside Height fields.
-
Click OK.