Work Orders
Measurement Entry Section Explained
Measurement Entry Section
Lower-right quadrant of the screen.
Measurements Tab
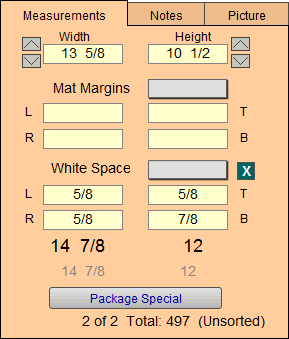
Width and Height Fields
Enter the Width of the image (or opening of the mat if it is to overlap the image) as a whole number and fraction.
Enter the Height of the image (or opening of the mat if it is to overlap the image) as a whole number and fraction. (Enter the amount of white to appear around a limited edition print in White Space field).
Orientation Icon
Indicates the vertical or horizontal direction of the artwork.
If you have selected the Show Orientation Dialog checkbox from the Main Menu > Work Orders > Options tab, then the Orientation icon appears above the Width and Height fields.
Additionally, when you create a new Work Order, a dialog box requests that you select an orientation. You may choose to by-pass this by clicking None. If you select None, then the icon does not appear on your screen (however a square icon appears on the printed Work Order).
The selected orientation appears on the screen and on the printed Work Order.
Matboard Margin Fields
The matboard Margins indicates the total amount of margins to appear between the image and the frame.
Use the Mat Margins pop-up menu to quickly enter all four matboard margins at once. Select the appropriate number from the menu of pre-entered amounts or use the Edit… feature to customized the list or use Other... to create a one-time entry.
Or click in each individual field to enter the mat dimensions (L = left, R, T, B) manually.
White Space Fields
Use the White Space field to check the amount of space between the image and the edge of medium.
This is normally used for L/E prints to ensure that the mat margins chosen are larger than the paper size. Numbers appear here only when the item is selected from the Product List / Select Artwork button (magnifying glass icon, located in the artwork section).
In order to bottom weight, click in the field (beside the letter B) to enter the bottom weight manually. Bottom weight may be defaulted in Main Menu > Work Order > Options tab > More Options > Work Order Defaults tab. If you have selected this option it will auto-fill the bottom weight. As always, this may be over-ridden. Below this field are L, R, T, B fields. The numbers appearing in this area indicate the total White Space to be added to the width and height of the image. E.g., use this feature when allowing space for signatures on L/E prints. If the signature on a Limited Edition print is large you may need to manually adjust the bottom white space.
Inside Frame Measurement
The two BOLD numbers under L, R, T, B fields are the Inside Frame Measurement. It is the sum of the numbers above it; image + margins + whitespace. This field cannot be modified from this layout.
Outside Frame Measurements
The two small GREY numbers under the Inside Frame Measurement are the Outside Frame dimensions. This is calculated by adding the width of the moulding used in the total frame package to the inside frame measurement. This information is handy when a customer or designer wants to know how much wall space the frame will occupy on the wall.
Package Special Button
A convenient place to store Work Order templates that represent special offerings. There is no limit to the number of package that can be stored. Each package special must have its own identifying code. The components that make up a package special can be actual items or they can be generic (eg., wood up to 16×20).
Number of Records Label
The current record number;
followed by the number of records in the current found set;
If this number is greater than one, then you can scroll through the records using the yellow arrows at the top of the screen
On Windows, you may also use Ctrl + Up and Ctrl + Down.
followed by the Total number of records in the Work Order file database.
Notes Tab
Notes Field
Use to keep track of anything particular to this framing job in the yellow text field.
Also accessible from the Frames Notes icon/button on the top menu bar; launches a dialog box where special instructions may be notated to this Work Order. When notes have been added, the icon/button on the Work Order changes.
Side Mark, Plan, Room Fields
Use for corporate clients and refer to installation locations. Will be printed on Work Order.
These fields may show up on your Invoice.
Index Field
Use to view other notes you have used, in case you would like to auto-enter something you have already typed.
Picture Tab
Store single or multiple photos related to or of the Work Order. Photos do not appear on any printed documents.
Photo Field
Displays the first photo stored in the Picture File for this Work Order.
Picture File Button
stores an unlimited number of digital photos. It is the same button that appears in the Shop tab of the Work Order screen.
Insert Picture Button
Use to import digital photos from your hard drive.
Note Field
Use to store notes for this specific photo.