Contacts
Exporting Contacts to a Third Party
A selected group of Customer names can be saved in a file and sent digitally to another company for direct mail campaigns.
Files can be saved in a variety of popular formats, e.g. tab-separated text, comma-separated text, DBF, .xlsx
Your customer file can be saved to your hard drive, USB drive, or burned onto a CD.
The data file can also be uploaded to online email marketing services such as Constant Contact or Mailchimp.
This is a level4 function only.
How to Export Email Addresses (Fast)
Login as level4.
From the Main Menu, click the Contacts icon.
Click either the sidebar (form view) or tool bar (list view) Export Email Addresses button.
A dialog box appears.Choose Found Set or All.
A list of email addresses appears along with an Export Records to File dialog.Change the Type field to match your needs, e.g. Comma Separated Text, and give the file a name. Click Save.
The Specify Field Order for Export dialog appears.Confirm that, in the Field export order box, the field called Email is there. Click Export.
Locate and open the file you just created to confirm it's contents. Remove all rows which do not have the number 1 in the Primary column. Those rows are duplicate email addresses of people already on your list.
Your file should now be ready to save and send to your third party company.
How to Export Email Addresses
Login as level4.
Go to Main Menu and click on the Menu Bar > Perform > Restore Full Menus.
In the Contacts section, click the Find Contact button.
In the Enter Search Criteria screen, enter the criteria to find the group of customers you wish to include in your mailing, e.g. Spent over a certain dollar amount, made a purchase in the last 6 months, etc.
To Omit items from your search group, see Find Feature.In the Email field, enter an asterisk *
This tells FrameReady that the Email field cannot be empty.Click Perform Find button.
A list of all clients who match the criteria appears. The right-hand column displays the email addresses.Click the Export Email Addresses sidebar button.
A dialog box appears offering three choices: Export all of the addresses in your database or only the Found set or Cancel.Click Found Set button.
The Export Records to File dialog box appears.Select the location to where the file will be saved (such as Desktop).
Select a file format in the Save as type field.
If in doubt, ask the company handling your email marketing. Tab Separated Text is a common choice as is Comma-Separated Text File (CSV).In the Save as field, type in the name of the file so that it can be easily found later.
If you are sending the file to another company, it is a good idea to put your company name on the file, e.g. MyGalleryCust14 and not just a generic name, e.g. customerlist.Click Save.
The Specify Field Order for Export dialog box appears showing Email as the only field to be exported.You may choose to add additional fields to your export.
The fields on the left are available for export.
The items listed on the right, under the heading Field export order, are the fields that will be included in your file.
Move any field to the right side of the screen by double-clicking on it, or single-click on it and then click the Move button.
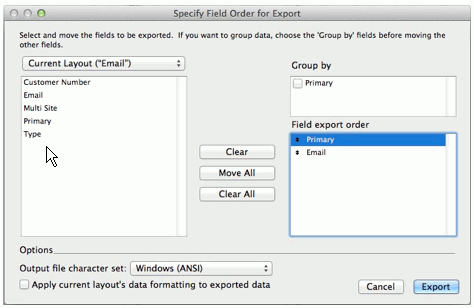
The following items are recommended for email marketing:
Primary
Email
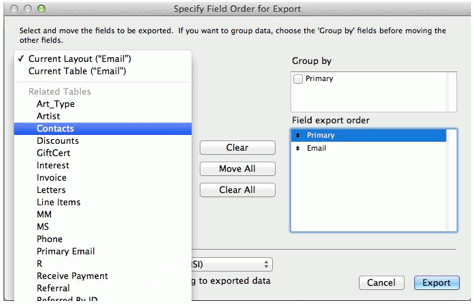
Contacts::NameFirst
Contacts::NameLast
Use the arrows beside the field name to drag items up or down in the list.
To locate the ::NameFirst and ::Name Last fields, click the heading: Current Layout (“Email”) to view the drop down list. Select Contacts and move the name fields to the Field export order column.
Click Export.
Your file is saved in the location you specified and with the information for the fields you identified.
Click Menu bar > Scripts > Main Menu to return to the FrameReady program.Locate and open the file you just created to confirm it's contents. Remove all rows which do not have the number 1 in the Primary column. Those rows are duplicate email addresses of people already on your list.
Your file should now be ready to save and send to your third party company.

As you can see, the name 'Bert de Roo' appears three times: only the Primary (1) email address should be used. The other two should be deleted along with all email addresses which do not have a 1 in the Primary column.