Set up your List of Framing Items
Customize the items you use to reflect your shop: change the terminology, remove items, add items, change the pricing, etc.
When you assemble a Work Order, the items that appear in each drop-down list, e.g. Mat Design, Hardware etc., are stored in the Price Codes file.
Tip: We recommend that you edit these lists to meet your shop needs.
Each of these groups contain their own items:
-
Mat Design
-
Mounting
-
Hardware
-
Glass
-
Extra
-
Fitting
Important: Moulding, Matboard and Fabric items are automatically updated with the FrameReady Vendor Subscription, so it is recommended that you do not change the names of items in those three groups.
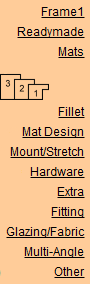
The Relationship between Price Codes and Work Orders
|
Work Order Groups |
Price Codes Groups |
 |
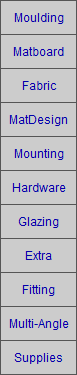 |
You can learn more about the how groups are related between the Work Order and Price Codes file.
How to set up your List of Framing Items in Each Group
Note: You should delete items that you do not use, or change the name of an unnecessary item to one which you will use.
-
In Price Codes, click the appropriate group button, e.g. Mat Design sidebar button.
-
Then click List View button (top centre) to see all the items currently listed with that group.
Items appear on the screen in the order they were entered.
There are three things you may want to do:
-
Keep the items you will use (in which case, no action is required).
-
Delete an unwanted item.
-
Rename an item to match the terminology for your shop.
Flag an Item for Removal
-
To flag an item for deletion, click the Marked checkbox beside the item in the list.
Tip: Before flagging an item as Marked, perform a find for marked records so that you avoid accidentally deleting records you want to keep. See also: Using the Marked Field
Rename an Item
-
Click an Item name to switch to Form View, then click in the Item field (where the name appears)
-
Simply write over or delete/backspace the name and enter what you want it to be (don't leave it empty).
-
Click the List View button to go back to the list.
When you get to the Bottom of the List
-
If you have marked items for deletion, then click the Delete Marked Records button (otherwise, start on the next group to be customized: Mounting).
-
Before you continue, double-check that only the items you marked are in the list. If the list is correct, then click the Delete All button. (If other people have marked items, they will appear in your list as well, so you may need to Cancel, if this is the case.)
-
You will need to click on Form View (top centre) after the items are deleted. Then continue with the next group: Mounting, etc. until all groups have been edited.
How to Add New Items
-
To add new items, you can either duplicate a record or create a new one with the buttons in the top right corner, i.e. New Item button or Duplicate Record button which is available only in the Form View.
-
In the Form View of the record, make the necessary changes to the item. As you type the changes, they are saved.
Tip: To see how your finished list appears in a Work Order, click a Group, e.g. Mat Design, then click on List View, then click on the underlined Item button; the list will be sorted.
Tip: The list is sorted alphabetically, so you may want to group items together, e.g. Vgroove - single; Vgroove - double, etc. Alternatively, place a number before the item to have them appear at the top of the list, e.g. 01 - Vgroove, 02 - Painted Panel, etc.
© 2023 Adatasol, Inc.