Convert a Work Order to a Product
The Convert/Update feature attaches Work Orders to the Products file. Use to select artwork from your inventory, frame it, and send it back to inventory or to create your own readymade frames and add them to your Products file.
The Convert/Update Button

Convert Feature
-
Converts a Work Order into a retail Product item, e.g. readymade.
-
A new record is created in the Products file with the size of the frame as the description.
-
The Work Order is deleted.
-
Print a label for your readymade frame using the side bar on the Products file.
Update Feature
-
Update a piece of in-stock art into a framed piece.
-
If a L/E print is selected, then FrameReady updates the original record in the Products file to a framed print containing the pricing of the print and the frame.
-
If an open edition print is selected, then a new record, with a new item number, is created in the Products file and the inventory of the original record is reduced by one.
-
In both cases the word Framed is added to the Category field in the Products file (e.g. “Framed L/E Print”).
How to Create and Track Retail Items
The Convert/Update sidebar button in the Work Order file is used for this procedure.
-
Create a new Work Order but do not assign it to a Contact.
Work Orders posted to an Invoice cannot be converted or updated.
-
Enter the artwork using the magnifying glass icon to the left of the Condition field. Choose by either Item Number, Description or Artist name.
-
If the artwork dimensions are stored in the Products file, then they are auto-filled in the width and height fields. If not, enter them now.
-
Enter any matboard margins if applicable.
-
Fill in the Work Order with the necessary framing components.
-
Click the Convert/Update sidebar button.
-
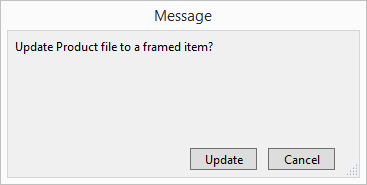
A dialog box appears asking if you wish to update Product file to a framed item. If a different dialog appears asking you to convert, then you have not chosen any artwork.
-
Click the Update button.
-
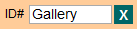
The Work Order ID# changes to read “Gallery” (because it now belongs to your shop).
-
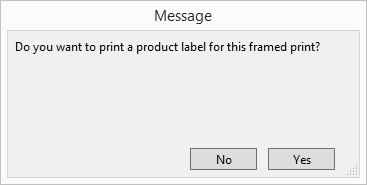
Another dialog box appears asking if you wish to print a product label at this time. If you click Yes, then it will show you the label on the screen and print it. You may choose to print it later from the Product file or the Label file.
-
If you accidentally click the Convert/Update button again, then you will receive this message:
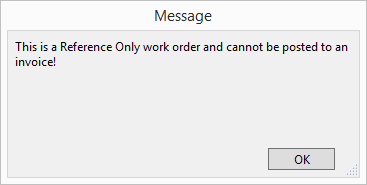
“This is a reference only work order and cannot be converted or updated!”
Click OK. Note that the Post to Invoice sidebar button now says Reference Only. -
Switch to the Products file and click Find.
-
Enter the Item/UPC number or the Desc/Title information of the piece you were just working on. Click Perform Find.
-
Note that the product has the term “framed” in front of whatever category you assigned it in the Category field:

-
If it was a L/E, then FrameReady updates the original record to a “framed” piece.
-
If it was an open edition stock piece (any record that does not have a value in the Edition # field under the brown Artwork tab), then a new record is created with a new Item number and the inventory of the original record is reduced by one (the yellow In field under the blue Inventory tab).
-
If this is a one-of-a-kind original, there are now two records for this piece. You may choose to delete the unframed original record.
-
-
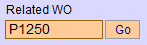
The Work Order related to this Product is shown. Use the Go button to switch to that Work Order.
© 2023 Adatasol, Inc.