Add a Discount on an Invoice
The Discount button applies the same discount to all retail items on the Invoice. If you have multiple items at various discounts, enter the items in groups, e.g. enter all items for one discount level (10%) and apply the discount, then enter the items at the next discount level (5%).
Before You Begin...
There are several ways to enter discounts directly onto an Invoice. The big choice is: Percentage discounts or Dollar discounts? They are entered differently on an Invoice -- and there are different rules for how they are entered.
A) Enter a percentage discount for one or two items.
B) Discount all retail items by a percentage.
C) Manually enter a dollar discount.
D) Add a pre-made "dollar discount" item from the Price Codes.
A) How to Enter a Discount per Item on an Invoice
This method is best when you have only one or two line items to discount, of the same or different percentage.
-
Enter the items onto the Invoice.
-
In the Line Item Entry section, click in the item's % field.

-
Enter the percentage as a decimal. For example, enter 0.05 for a 5% discount.
B) How to Discount Retail Items Only
We recommend that you first enter all the retail items to be discounted, apply the discount, and then enter the non-discounted items. Or, you can enter items that have different discounts and then apply an amount to those items.
-
Click the Discount button (top left corner).

-
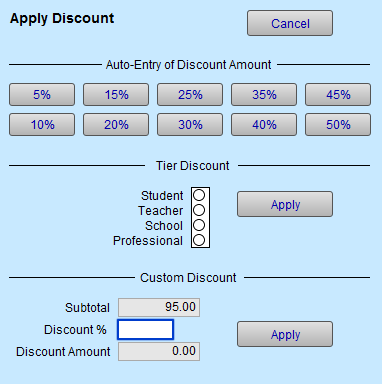
The Apply Discount window appears.

-
Click any of the preset percentage buttons or enter your own percentage as a decimal in the Discount % field.
When finding line items to subtotal, FrameReady automatically omits line items that already have a discount, or if the Invoice Category is Work Order or is Gift Certificate. -
Click Apply or Cancel to return to the Invoice.
Tax Exemptions & Discounts
-
Tax exemptions are entered in the Contacts file, on the customer’s record, under the Terms tab.
C) How to Manually enter a Dollar Discount
Dollar value discounts must be entered on a separate line, as a separate line item. Be sure to enter the Category field or your financial records will not balance. Note: the discount applied this way will not appear in the Savings field.
-
Enter the items onto the Invoice.
-
Click in the line below the item to be discounted or after the last item on the list.
-
In the Description field, enter the reason for the discount.
-
In the Category field, select the word Discount .
If it does not appear in the drop down list, then simply type it into the field. Once added to an iIvoice, it is then available for all subsequent Invoices. -
In the Qty (Quantity) field, enter the amount as a negative number, e.g. -1
-
In the Unit Price field enter the dollar amount to be given as a discount as a positive number, e.g. 5 .
The Subtotal field automatically displays the amount as a negative.

D) Enter a Dollar Discount using an Item Number
This method allows you to quickly enter a selected dollar discount and autofill the line item on the Invoice. It also helps to track how often discounts are given.
Create the Discount Item in the Product file
-
Go to the Products file. Create a record or item by clicking the New Item button (top right).
Tip: you can change the generated product number to be something unique and easy to remember such as, DISC-A, or DISC-10, etc.
-
Enter the Description, e.g. Authorized Discount, Discount of $10
-
Select the Category as Discount .
-
Under the Pricing tab, in the RETAIL field, enter the dollar amount as a negative number, e.g. -10 .
Enter the Discount Item as a Line Item on the Invoice
-
Create an Invoice as usual and enter the Item(s) sold to the customer.
-
In the next available line, enter the discount item you created earlier in the Product file, e.g. DISC-A .
All of the fields auto-fill and the dollar amount is negative. -
The Qty field in the Product file tracks how often the item is used on an invoice.

© 2023 Adatasol, Inc.